Image Manager
- Support

- Dec 12, 2023
- 3 min read
Retreat Portal maintains all images that have ever been uploaded and used. Most of the time images are uploaded and used just once, but sometimes you will want to use the same image over and over, for example a logo or a presenter's image.
Any time you want to select an image in Retreat Portal the Image Manager will appear allowing you to find an existing image or to upload a new one.
This tutorial will go over how images can be found, uploaded, as well as how to replace or version an image to meet your needs.
To access the Image Manager log into Retreat Portal console, click the gear icon in the top-right of the page and then select Business. On the left side of the screen click 'Image Manager' under Libraries. Or the Image Manager will appear anywhere you click to set/change an image (e.g. marketing images, presenters, logos, etc.).

A preview of the image is shown as well as the label you've provided for the image, whether it is versioned or archived. By default archived images are hidden, but that can be changed by unchecking the 'Archived' box at the top of the table.
Tags can be manually added to images, but some are auto-generated. If the image is used in a program, then there will be a 'Programs' tag along with the title of the program it was associated with. The same goes for presenters or logos, etc.
Upload an image
Click the Upload button on the top-right of the table. Begin by clicking the Browse button or dragging a file to the Browse button. The image will be automatically uploaded, a preview shown, and the file name will be used as the Label.
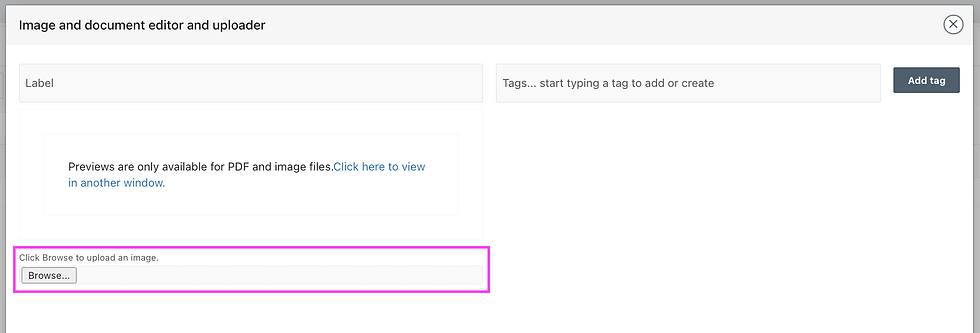
The status of the upload will be shown and when the upload is complete the label will be automatically updated and a preview of the image shown.

If you want to choose a different image, then just click Browse again and select a different image. The preview will change, but not the Label - you must manually change the Label if it is not blank at the time of upload.
At this point you may also add tags by typing in the Tags box and then click Add tag. To learn more about Tags view this tutorial: https://www.retreatportal.com/post/retreat-portal-tag-manager
When you are done click Save and the Image Manager will show the new image.

Replace the image
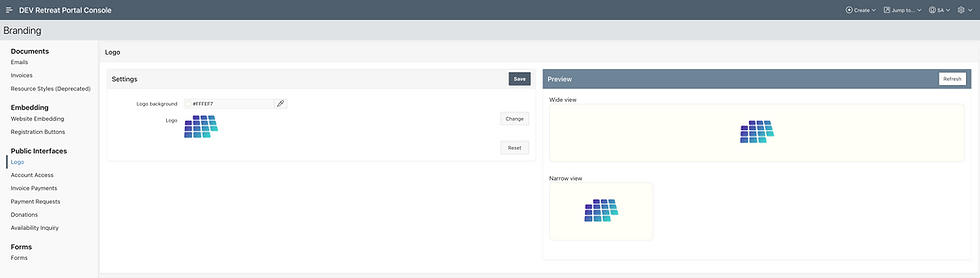
Most of the time you'll want to replace an existing image with the new one. For example, if you set an image as your logo or the presenter's bio image, then replacing the image in Image Manager will update it everywhere.
For example, let's say the gold image above were stored as our Branding > Logo

To replace that logo go to Image Manager and click the three dots on the far right side of the table and select Edit.
In the editor window you will see the label, the image, tags, and the Browse button again. Click Browse and find the new image you want to use. Once you've confirmed the new image you want, then click 'Save as replacement' in the bottom of the form.

That's it. The image will change anywhere it was previously referenced.
Version the image and keep old references
Versioning an image is less common, but may be desirable. When an image is updated with a new version it means any old references stay the same. You will have to manually go to any locations where you want to use the new image and specify the new image is to be used.
As with the replacement steps you'll find the image you want to version, click the three dots, and select Edit.
In the editor dialog click Browse and when you have the image you want, click "Save as a new version" rather than save as replacement.

The Image Manager will be updated to show the new image, but prior references to it will not get updated. You'll see a green dot under the Versioned column for the image. If you want to view the past versions of the image click the three dots, and select 'View versions'

Archive the image
If you no longer wish to see an image listed in the Image Manager by default you can archive the image. The image isn't ever deleted because there may be prior references to it, but archiving will mean it doesn't appear by default when selecting images.
Find the image you want to archive, click the three dots on the far right side of the table, and click Edit.
At the bottom of the form is a red 'Archive' button. Click it and the image will be automatically archived.
To undo the archive (i.e. Unarchive) change the table listing to show archived, then click the three dots of the image you want to unarchive, click Edit. In the editor form the red archive button is replaced by an 'Unarchive' button. Click it and the image will no longer be archived.
Comments